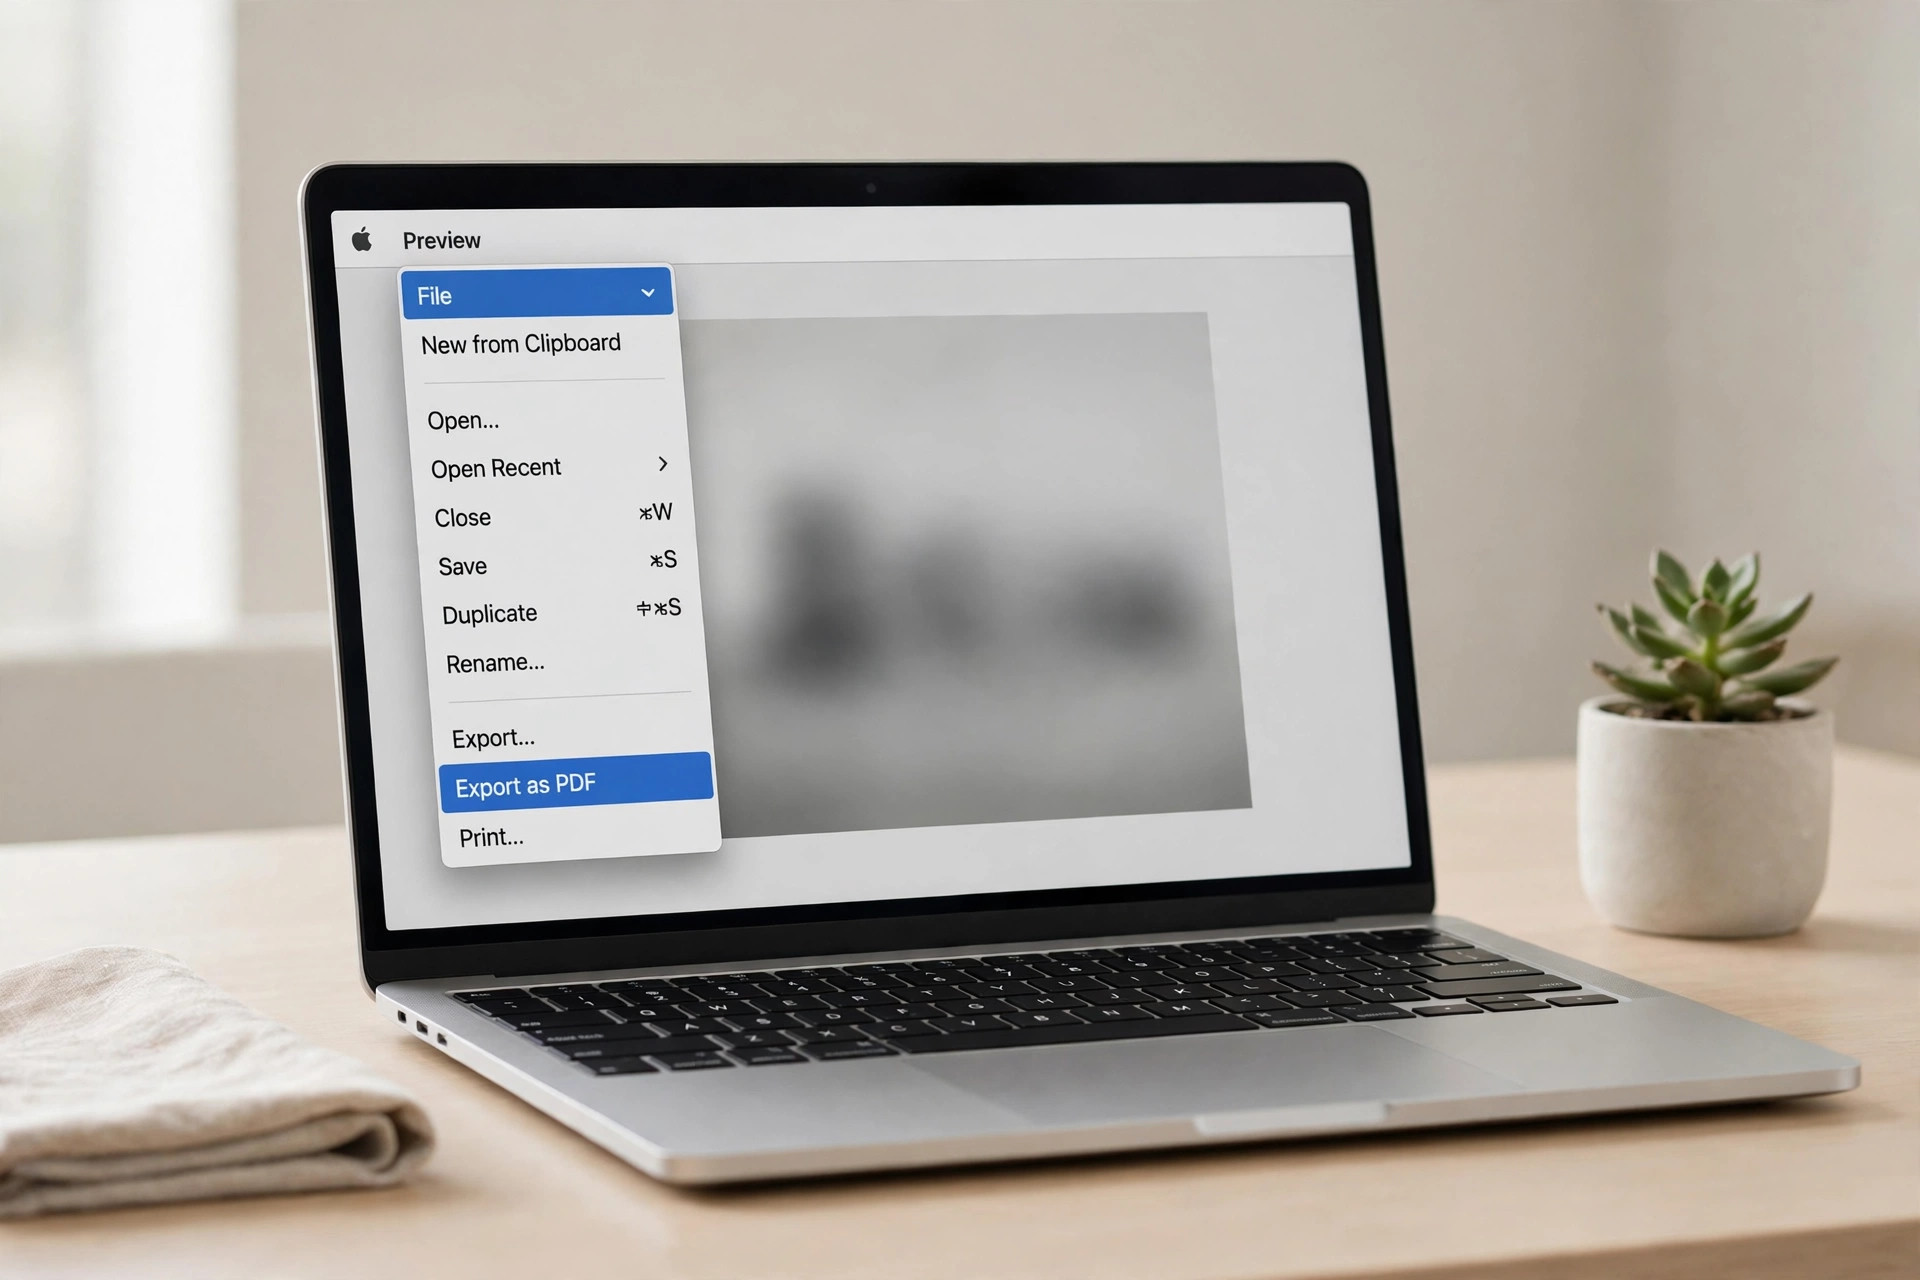
Mac saves every screenshot as a PNG, yet Preview turns it into a PDF in seconds. Open the shot in Preview, choose File, then Export as PDF. This guide shows five free ways to turn a screenshot to PDF on Mac.
Why Mac Makes This Job Easy
macOS treats PDF as a native format, so no converter app is needed. Preview opens every screenshot by default and exports PDF in one menu. The export keeps the image at full Retina sharpness with no margins. Print to PDF works too, yet it scales the shot to a paper size. Preview is the key that turns a screenshot to PDF on Mac in one menu.
Smallpdf notes the same Preview export as the simplest Mac route. Our Mac full page screenshot guide shows Safari and Chrome captures first. Our iPhone screenshot to PDF guide covers the same job on iOS.
Method 1: Preview Export as PDF
This is the fastest way to turn a screenshot to PDF on Mac. It needs no install and no online tool at all. The whole job takes under a minute from capture to saved file.
Step 1: Press Command plus Shift plus 4 and drag across the area. The screenshot saves to the desktop as a PNG file.
Step 2: Double-click the screenshot to open it in Preview. Use the markup tools to crop or annotate the shot first.
Step 3: Choose File, then Export as PDF from the menu. Name the file, pick a folder, and click Save.
Preview export adds no white border around the image at all. The PDF page matches the screenshot size exactly, so text stays crisp. Keep the PNG too if you may need the raw image later.
Method 2: Print to Save as PDF
The print route also turns a screenshot to PDF on Mac at paper size. It scales the screenshot to A4 or Letter with clean margins. Use it when the PDF must print exactly like a page.
Step 1: Open the screenshot in Preview as before. Press Command plus P to open the print dialog box.
Step 2: Click the PDF menu in the bottom left corner. Choose Save as PDF from the small dropdown list.
Step 3: Pick a name and folder, then click Save. Preview saves the screenshot as a PDF at paper size.
Print to PDF adds margins, so small text can shrink a little. Preview export stays sharper for screenshots with fine detail. Setapp also lists Preview export as the fastest single screenshot route. Our screenshot to A4 PDF guide shows the clean A4 layout route.
Method 3: Finder Quick Actions for Many Shots
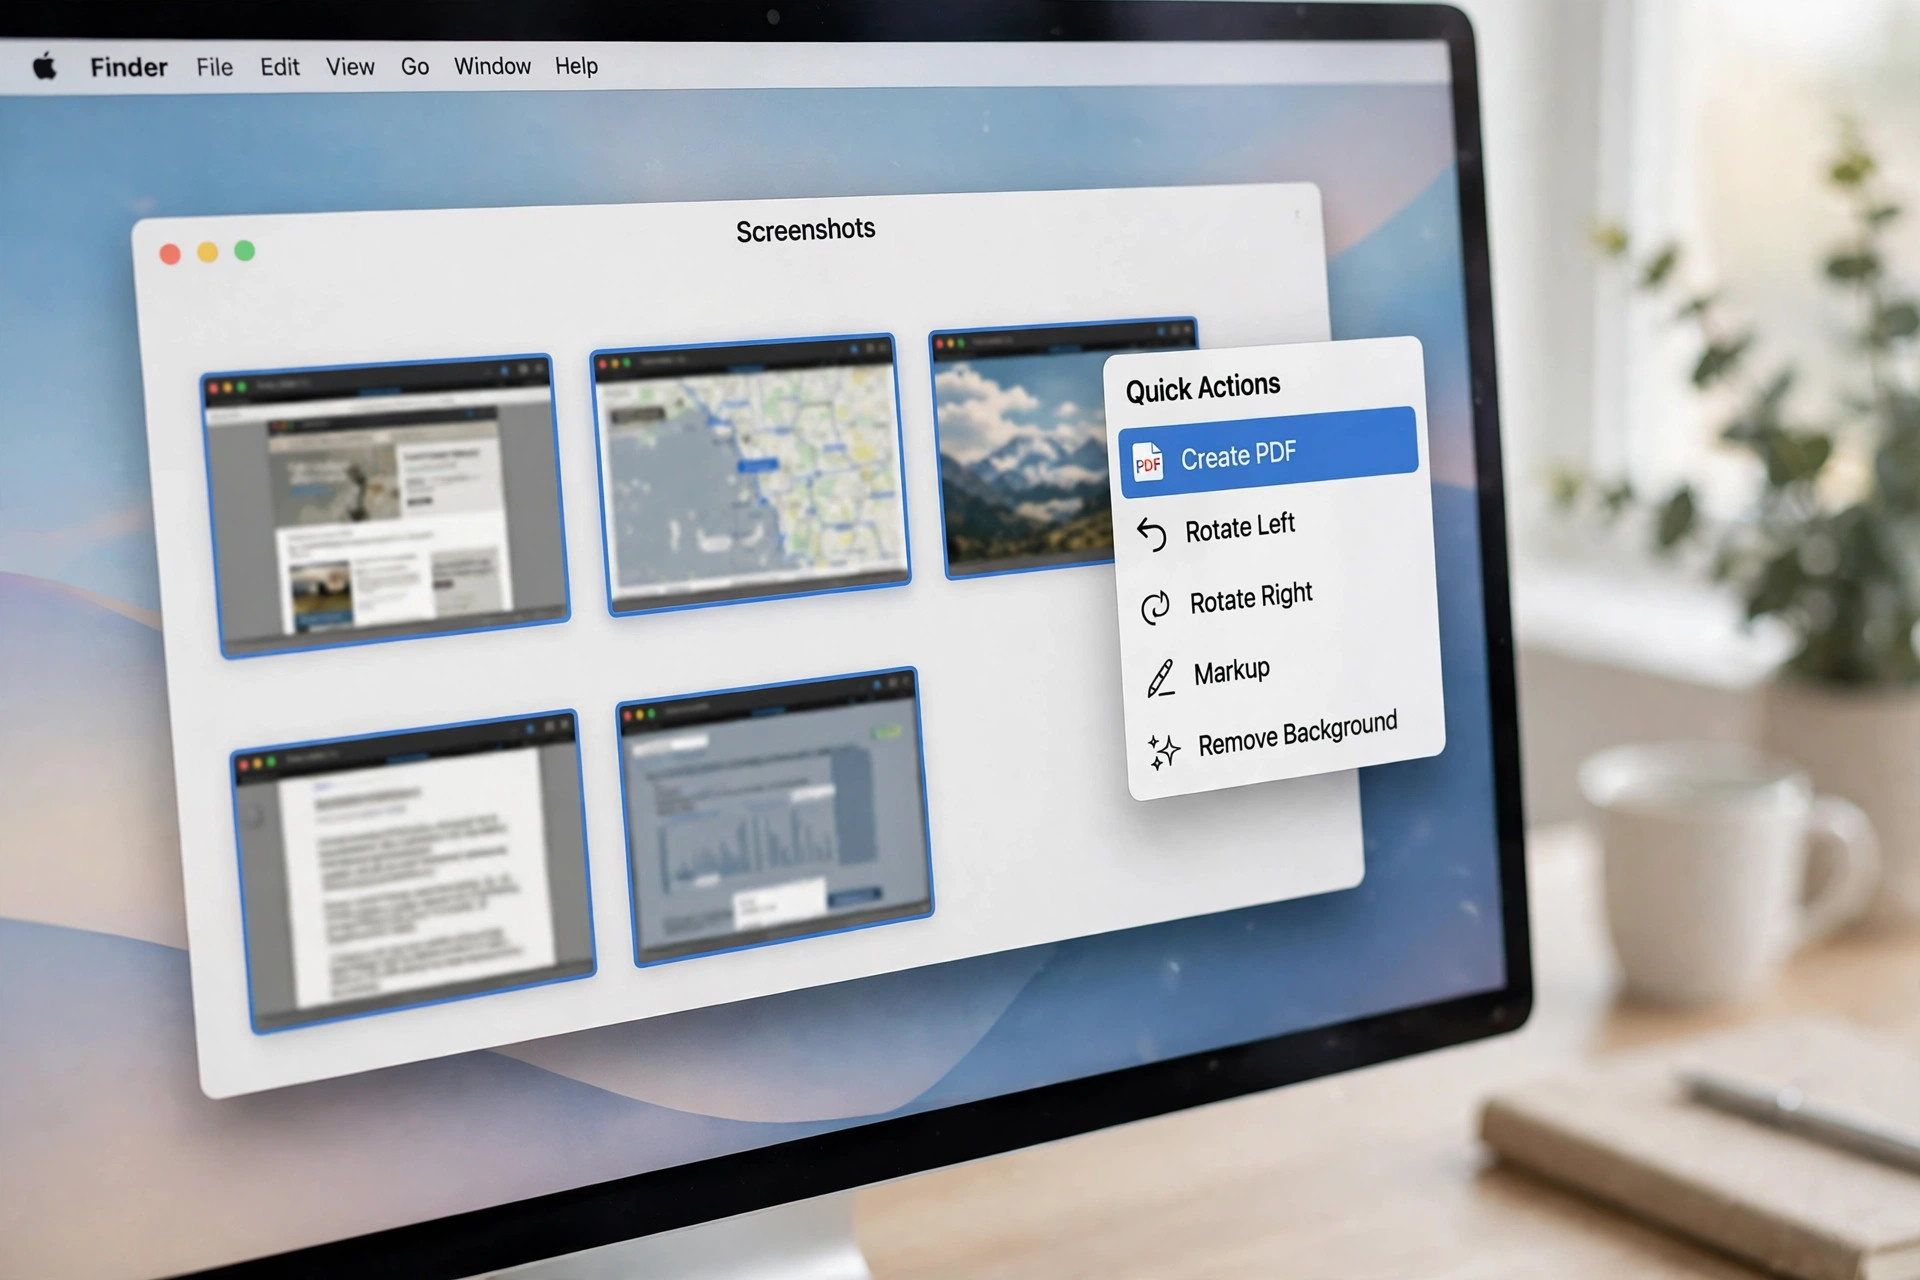
Finder can turn a screenshot to PDF on Mac in bulk, without opening Preview. Select the files, right-click, and pick Create PDF from Quick Actions. The order follows the file names, so rename them first.
Step 1: Select the screenshots in Finder with Command plus click. Rename them with numbers like 01, 02 and 03 first.
Step 2: Right-click the selection and open Quick Actions. Choose Create PDF from the menu that appears.
Step 3: Finder builds one PDF beside the image files. Rename the new PDF so it stays easy to find.
Quick Actions needs no extra app and keeps the job offline. Each image lands on its own page in the same file. Our merge images into one PDF guide shows the online route with more layout control.
Method 4: Safari Export as PDF for Web Pages
A web page often needs text that stays selectable in the PDF. Safari can export the live page as a PDF without any screenshot. Use it for receipts, tickets and articles you must keep.
Step 1: Open the page in Safari and wait for it to load. Scroll once so lazy images appear before you export.
Step 2: Choose File, then Export as PDF from the menu. Name the file and pick a folder to save it.
Step 3: Check the PDF for missing images or cut text. Chrome users can press Command plus P and choose Save as PDF.
Safari export keeps links clickable and text searchable in the file. A screenshot cannot do that, since it stores only flat pixels. Our PDF to JPG guide shows how to turn the pages back into images.
Method 5: Terminal Shortcut for Direct PDF Screenshots
Advanced users can make macOS save screenshots as PDF files directly. One Terminal command changes the default format from PNG to PDF. Revert it any time with the same command and PNG instead.
Step 1: Open Terminal from Applications, then Utilities, and type the command below. Press Return to apply the new format at once.
defaults write com.apple.screencapture type pdfStep 2: Restart the screenshot service so the change takes effect. Take a screenshot, and macOS saves it as a PDF file.
killall SystemUIServerStep 3: Revert the format with the same command and PNG. Run the restart command again to restore PNG screenshots.
defaults write com.apple.screencapture type pngTerminal suits users who turn a screenshot to PDF on Mac every day. Most users should stick with Preview export, which needs no command at all. A wrong Terminal command can change settings, so copy each line exactly.
Frequently Asked Questions
Can I turn a screenshot to PDF on Mac without any app?
Yes, Preview is built into every Mac and exports PDF free. Open the screenshot, choose File, then Export as PDF.
Why does my screenshot save as a PNG on Mac first?
macOS saves screenshots as PNG by default for speed and quality. Preview converts the PNG to PDF only when you ask it to.
How do I put many screenshots into one PDF on Mac?
Select the shots in Finder, right-click, and choose Quick Actions. Pick Create PDF, and Finder builds one file from them all.
Will the PDF keep my screenshot sharp at full Retina size?
Yes, Preview export keeps the image at its captured size and sharpness. Avoid the print route for fine detail, since it scales the shot down.
Preview export is the easiest screenshot to PDF on Mac route for most users. Finder Quick Actions handles batches, while Terminal suits daily PDF savers. Shrink a large PDF with our reduce PDF file size guide before you email it. Turn screenshots into a clean A4 layout with our screenshot to A4 PDF guide.
Leave a Reply